¶ 微信登录
¶ 准备工作
在 微信开放平台 (opens new window) 及 Authing 管理控制台 (opens new window) 进行配置请参阅 微信移动端 (opens new window)。
¶ 集成微信登录
¶ 第一步:添加微信登录依赖
在 swift package 搜索栏输入:https://github.com/Authing/authing-binary 。
Authing-binary (opens new window) 依赖于 Guard-iOS SDK (opens new window)。
依赖规则选择 Up to Next Major Version 1.0.0 。
Add Package 后勾选 Wechat 。
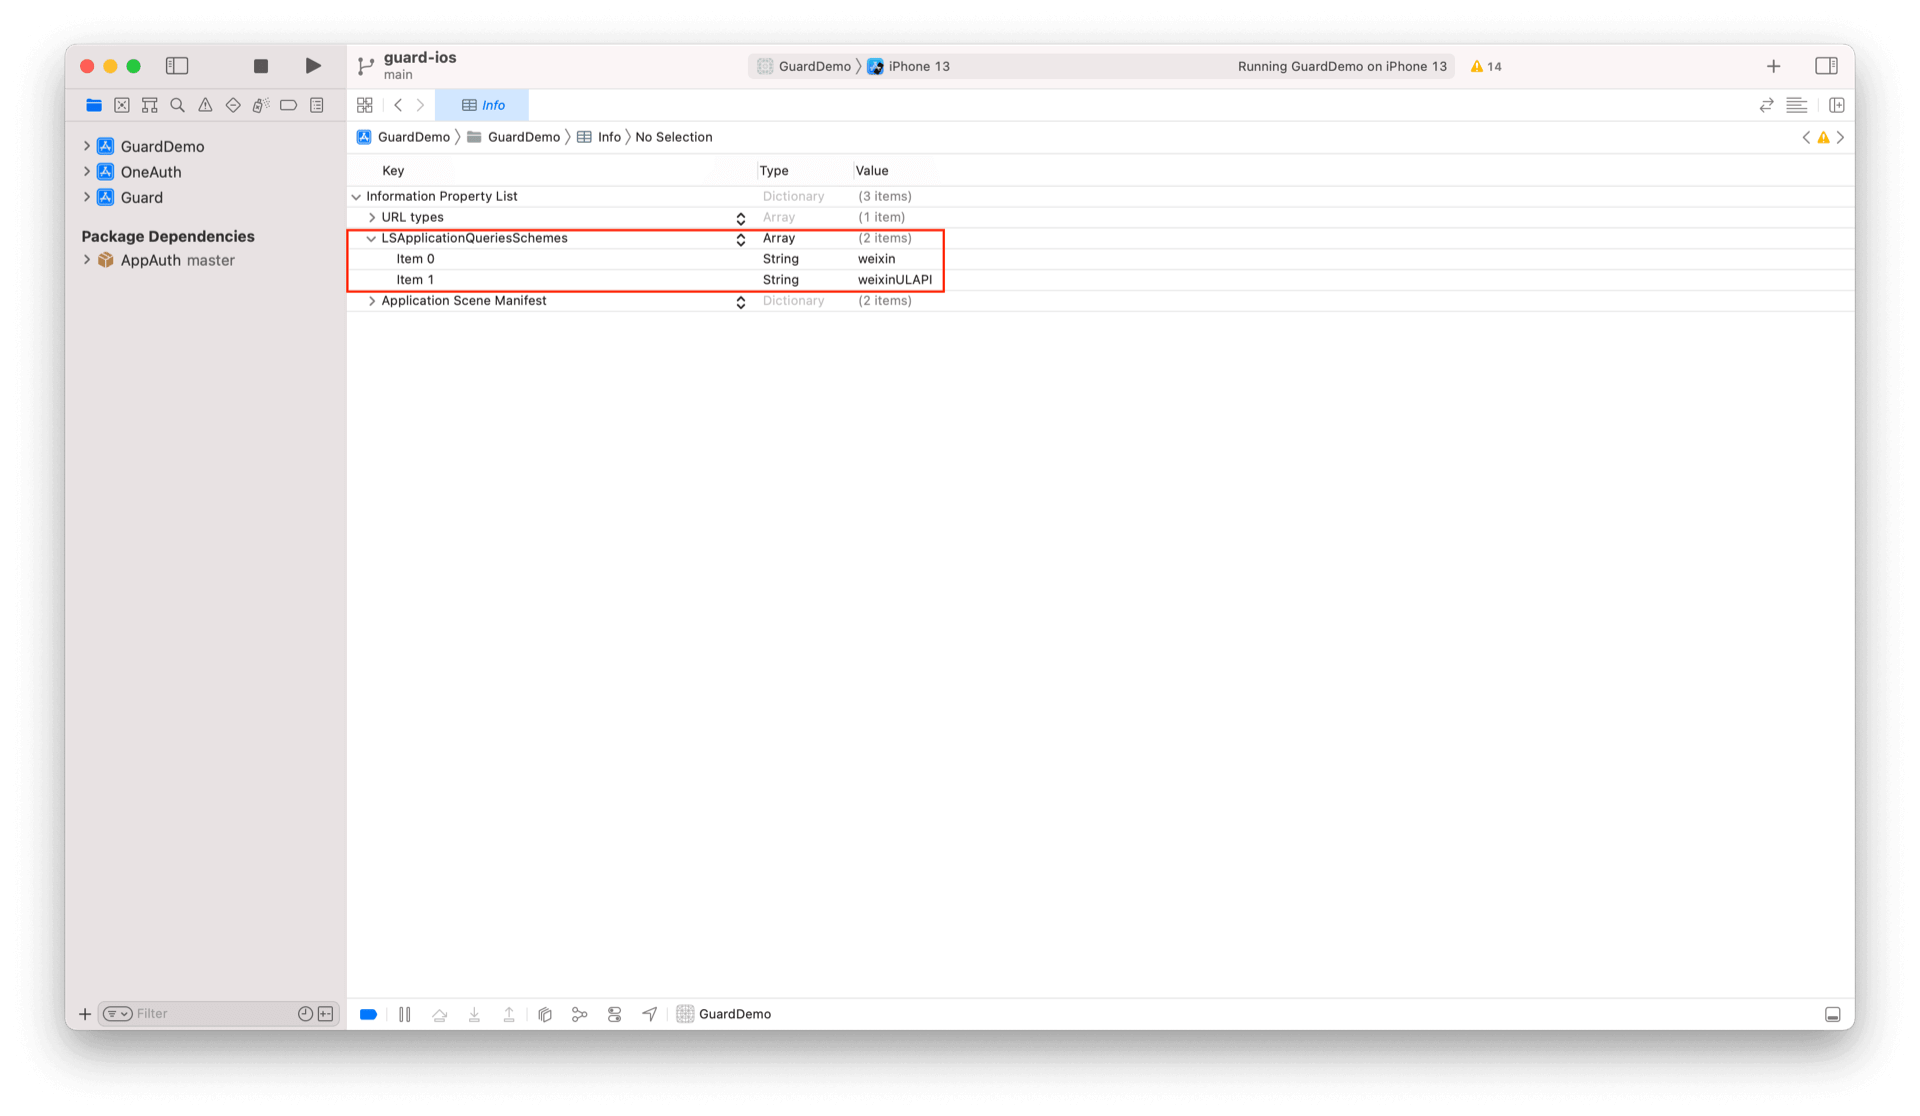
¶ 第二步:Info.plist 里面添加启动白名单
key: LSApplicationQueriesSchemes
value: weixin, weixinULAPI
注意大小写

也可以通过 Source Code 方式打开 Info.plist,然后复制粘贴下面代码:
<plist version="1.0">
<dict>
    ...
    <key>LSApplicationQueriesSchemes</key>
	<array>
		<string>weixin</string>
		<string>weixinULAPI</string>
	</array>
    ...
</dict>
</plist>
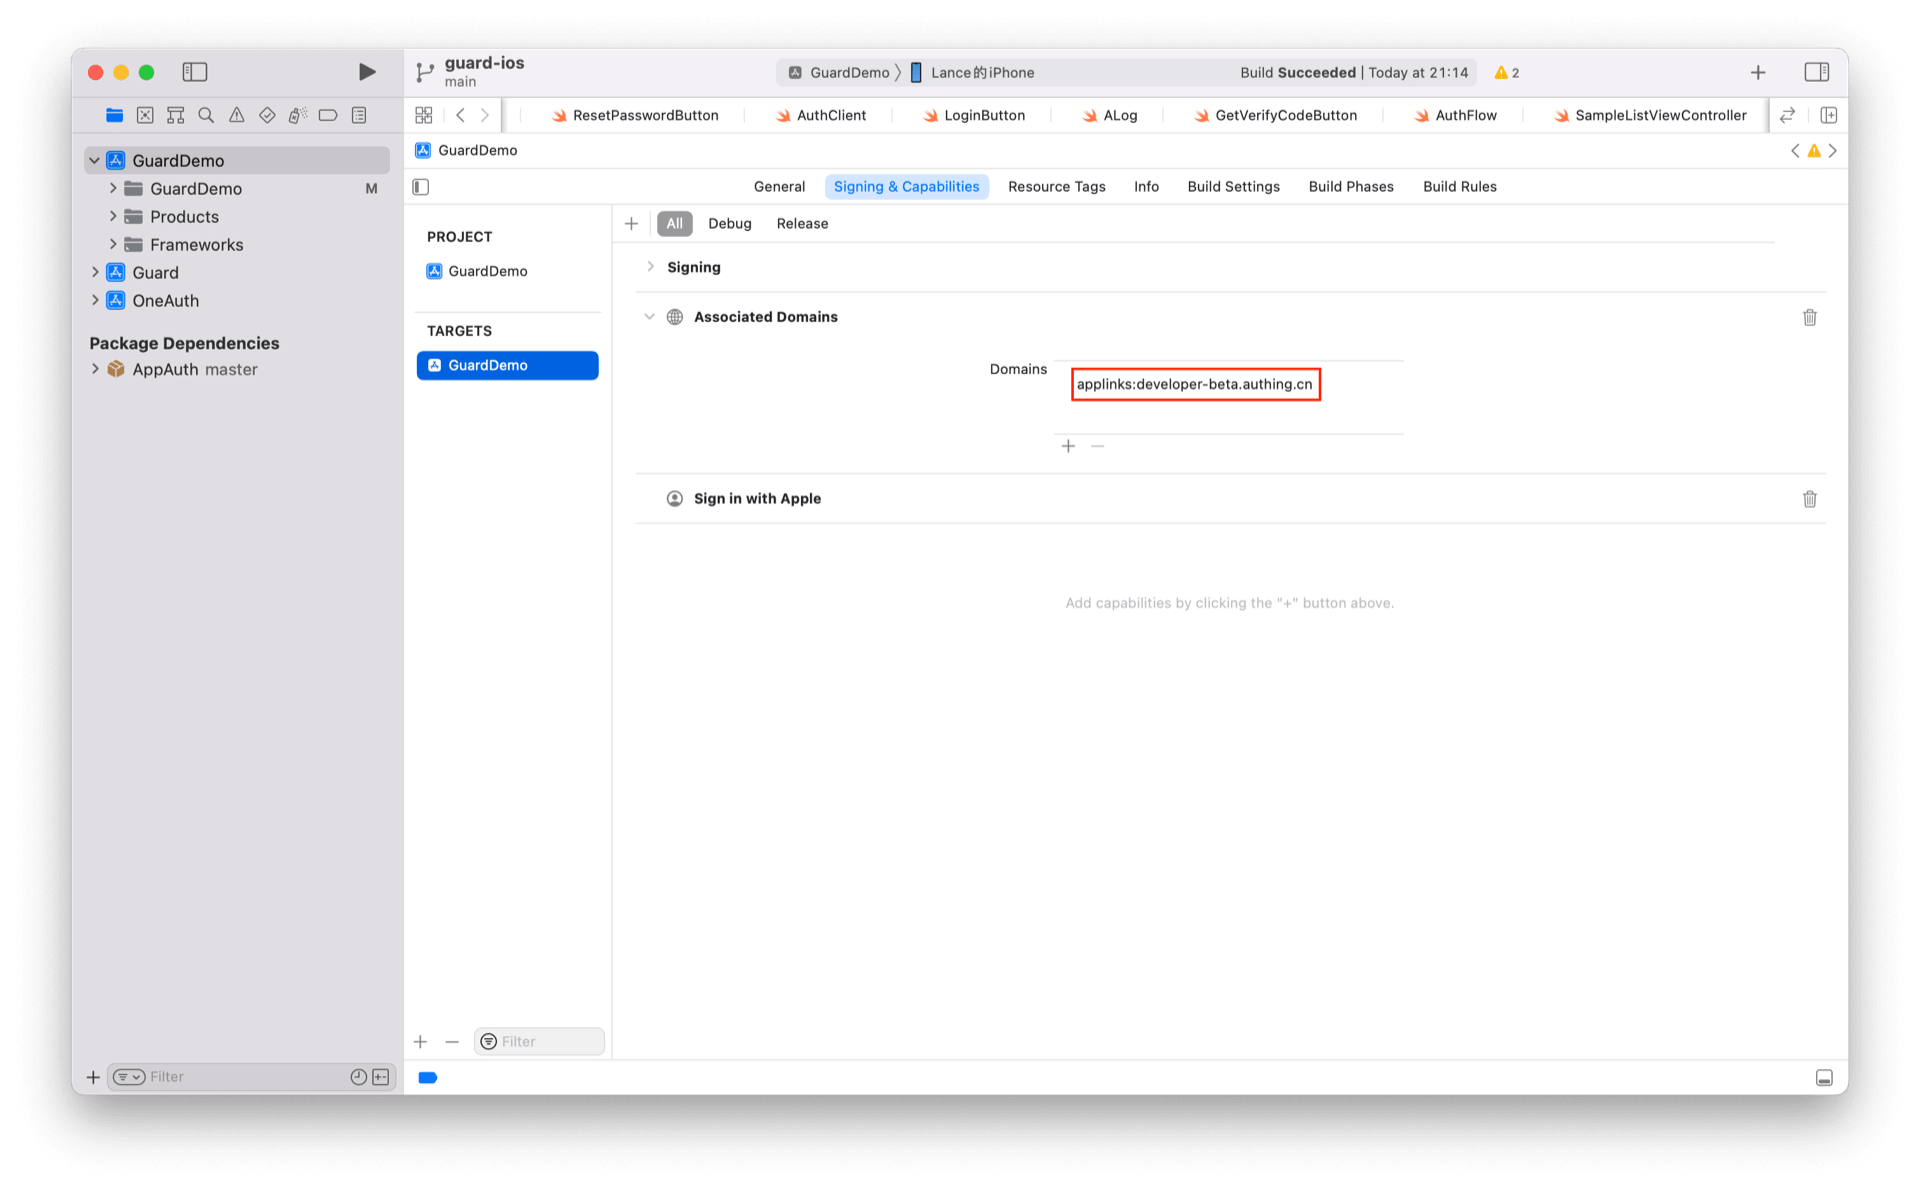
¶ 第三步:设置 Associated Domains:
填入开发者的 Universal Link 对应的 host 。

¶ 第四步:初始化微信登录
import Guard
import Wechat
Authing.start(<#AUTHING_APP_ID#>)
WechatLogin.registerApp(appId: <#your_wechat_appid#>, universalLink: <#your_deep_link#>)
第一个参数为微信应用 ID;第二个参数为 iOS Universal Link (opens new window)
¶ 第五步:处理微信登录回调
微信返回应用后,如果使用了 SceneDelegate,则需要在 SceneDelegate.swift 里面重载下面的函数:
func scene(_ scene: UIScene, continue userActivity: NSUserActivity) {
    NotificationCenter.default.post(name: NSNotification.Name(rawValue: "wechatLoginOK"), object: userActivity)
}
如果未使用 SceneDelegate,则需要在 AppDelegate 里面重载:
func application(_ application: UIApplication, continue userActivity: NSUserActivity, restorationHandler: @escaping ([UIUserActivityRestoring]?) -> Void) -> Bool {
    NotificationCenter.default.post(name: NSNotification.Name(rawValue: "wechatLoginOK"), object: userActivity)
    return true
}
¶ 第六步:发起微信登录授权
¶ 微信授权登录
func login(viewController: UIViewController, _ context: String? = nil, completion: @escaping Authing.AuthCompletion) -> Void
参数
- viewController 承载视图的 AuthViewController
- context 可选参数,请求上下文,这里设置的
context可以在 pipeline 的 context 中获取到。
示例
WechatLogin.login(viewController: <#ViewController#>) { code, message, userInfo in
    if (code == 200) {
        // 登录成功
        // userInfo
    } else if (code == 1640) {
        // 只允许绑定已有账号
        // userInfo.socialBindingData 中返回 method(登录方式) 以及 key(中间态键)
    } else if (code == 1641) {
        // 允许绑定已有账号,或者创建新账号
        // userInfo.socialBindingData 中返回 method(登录方式) 以及 key(中间态键)
    } else if (code == 2921) {
        // 多账号选择后绑定
        // userInfo.socialBindingData 中返回 accounts(账号列表) 以及 key(中间态键)
    }
}
如果只需获取微信的授权码:
WechatLogin.getAuthCode(viewController: <#ViewController#>) { authCode in
    // authCode:微信授权码
}
如果开发者自己集成微信登录,拿到授权码后,可以调用以下 API 换取 Authing 用户信息:
¶ 通过微信授权码登录
func getDataByWechatlogin(authData: AuthRequest? = nil, code: String, _ context: String? = nil, completion: @escaping(Int, String?, UserInfo?) -> Void)
参数
- code 微信授权码
- context 请求上下文,这里设置的
context可以在 pipeline 的 context 中获取到。
示例
AuthClient().getDataByWechatlogin(code: "Wechat auth code") { code, message, userInfo in
    if (code == 200) {
        // 登录成功
        // userInfo
    } else if (code == 1640) {
        // 只允许绑定已有账号
        // userInfo.socialBindingData 中返回 method(登录方式) 以及 key(中间态键)
    } else if (code == 1641) {
        // 允许绑定已有账号,或者创建新账号
        // userInfo.socialBindingData 中返回 method(登录方式) 以及 key(中间态键)
    } else if (code == 2921) {
        // 多账号选择后绑定
        // userInfo.socialBindingData 中返回 accounts(账号列表) 以及 key(中间态键)
    }
}
¶ 询问绑定 API
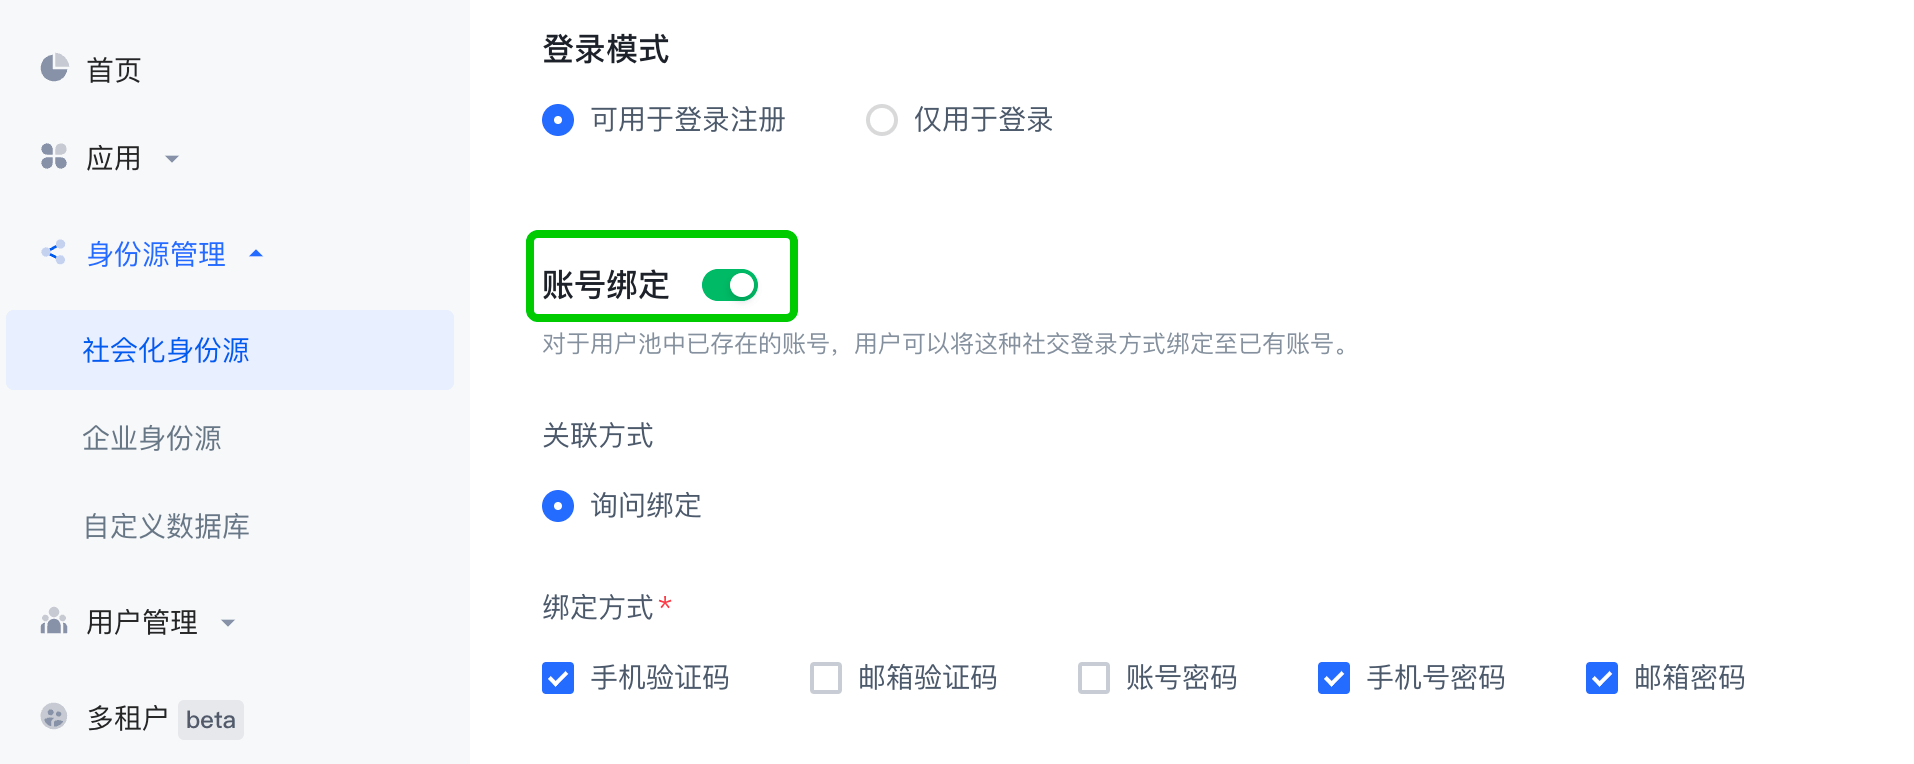
如果你想在微信账号登录的时候绑定实现询问是否绑定已有账号,可以在 Authing Console 控制台 (opens new window)中开启询问绑定功能,
身份源管理 -> 社会化身份源 -> 微信 -> 微信移动端 -> 账号绑定:

如果使用我们的 AuthFlow 托管页,开启了账号绑定后,托管页中处理了相关业务流程。
如果已经选择了登录模式,并且开启了账号绑定功能,通过如下 API 构建后续业务流程:
¶ 注册新账号绑定微信
如果登录模式选择了可用于登录注册,并且开启了账号绑定,在调用微信登录接口时会返回 1641 状态码以及 key,这个时候可以调用此接口直接创建账号。
func bindWechatWithRegister(key: String, completion: @escaping(Int, String?, UserInfo?) -> Void)
参数
- key 中间态键,通过微信授权登录返回
示例
AuthClient().bindWechatWithRegister(key: "key") { code, message, userInfo in
}
¶ 通过账号密码绑定微信
如果开启了账号绑定,在调用微信登录接口时会返回 1640 状态码、支持的绑定方式以及 key,如果支持的绑定方式包含username-password、phone-password、email-password,这个时候可以调用此接口绑定已有账号。
func bindWechatByAccount(account: String, password: String, key: String, completion: @escaping(Int, String?, UserInfo?) -> Void)
参数
- account 账号
- password 密码
- key 中间态键,通过微信授权登录返回
示例
AuthClient().bindWechatByAccount(account: "account", password: "password", key: "key") { code, message, userInfo in
}
¶ 通过手机验证码绑定微信
如果开启了账号绑定,在调用微信登录接口时会返回 1640 状态码、支持的绑定方式以及 key,如果支持的绑定方式包含phone-code,这个时候可以调用此接口绑定已有账号。
func bindWechatByPhoneCode(phoneCountryCode: String? = nil, phone: String, code: String, key: String, completion: @escaping(Int, String?, UserInfo?) -> Void)
参数
- phone 手机号
- code 验证码
- key 中间态键,通过微信授权登录返回
示例
AuthClient().bindWechatByPhoneCode(phone: "188xxxx8888", code: "1234", key: "key") { code, message, userInfo in
}
¶ 通过邮箱验证码绑定微信
如果开启了账号绑定,在调用微信登录接口时会返回 1640 状态码、支持的绑定方式以及 key,如果支持的绑定方式包含email-code,这个时候可以调用此接口绑定已有账号。
func bindWechatByEmailCode(email: String, code: String, key: String, completion: @escaping(Int, String?, UserInfo?) -> Void)
参数
- email 邮箱
- code 验证码
- key 中间态键,通过微信授权登录返回
示例
AuthClient().bindWechatByEmailCode(email: "test@example.com", code: "1234", key: "key") { code, message, userInfo in
}
¶ 通过 accounts 列表的账号 ID 绑定微信
如果开启了账号绑定,在调用微信登录接口时会返回 2921 状态码、支持的绑定的账号数据以及 key。
注意此 API 只能绑定 getDataByWechatlogin 返回的 accounts 中的账号,只针对同一微信身份源对应了多个 Authing 账号的场景。如果想直接调用绑定 API 无特殊场景处理,查看此 API :通过账号 ID 绑定微信。
func bindWechatBySelectedAccountId(accountId: String, key: String, completion: @escaping(Int, String?, UserInfo?) -> Void)
参数
- accountId 账号 id
- key 中间态键,通过微信授权登录返回
示例
AuthClient().bindWechatBySelectedAccountId(accountId: "AUTHING_ACCOUNT_ID", key: "key") { code, message, userInfo in
}
¶ 通过账号 ID 绑定微信
如果开启了账号绑定,调用此接口可绑定用户池中已有账号。
func bindWechatByAccountId(accountId: String, key: String, completion: @escaping(Int, String?, UserInfo?) -> Void)
参数
- accountId 账号 id
- key 中间态键,通过微信授权登录返回
示例
AuthClient().bindWechatByAccountId(accountId: "AUTHING_ACCOUNT_ID", key: "key") { code, message, userInfo in
}